In RAD Studio XE6, we introduced our BaaS (Backend as a Service) support. This includes components for both Kinvey and Parse. Part of our component pack is the TBackendUsers component which is designed to be hooked into either the ParseProvider or KinveyProvider component.
My sample application that I am building as part of this tutorial will allow me to create a user account on either Kinvey.com or Parse.com, with a defined username and password. If the account creation was successful, a message dialog will be shown. If the username already exists inside my BaaS account, it will automatically return a message, telling me to choose a different username. In this application, I am also using the Jet style pack which is included in our bonus pack if you purchase a Professional or higher edition of RAD Studio, Delphi or C++Builder XE6 by June 30th, 2014.

UI specs:
I placed a TToolbar onto my form, with a TLabel parented to it that is aligned to Center with a Stylelookup property of 'toollabel'.
I also placed a TListbox onto my form with one Listboxitem that contains 2 TEdits (one for the username, one for the password) and a TSpeedbutton (you can also use a TButton).
For the Password edit, you can check the 'Password' property, but I am leaving it unchecked for demo purposes.

The Listbox Groupingkind property is set to Grouped and the Stylelookup property is set to 'transparentlistboxstyle'. The Listbox is aligned to Center with a Bottom Margin of 100, and a Top Margin of 30.
The Stylebook that I dropped onto my form has the AndroidJet style assigned to it. I also changed the font color to green in the TextSettings property.
BaaS components:
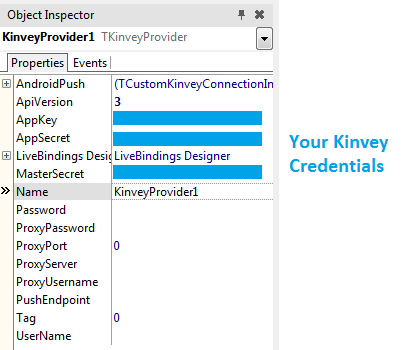
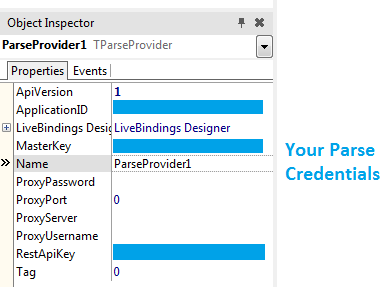
Place either a TParseProvider or TKinveyProvider component onto your form and enter your credentials. You will need to go to Parse.com or Kinvey.com to sign up for an account.
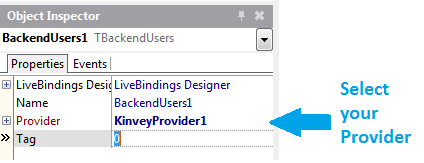
Next, add a TBackendUsers component and set the provider to ParseProvider1 or KinveyProvider1, depending on the BaaS provider that you have selected for your project.
My last step was to setup the on-click event that is fired when the user clicks on 'Create' to sign up for the account.
Object Pascal:
procedure TAccountSignup.btnCreateAcctClick(Sender: TObject);
var
ACreatedObject: TBackendEntityValue;
begin
BackEndUsers1.Users.SignupUser(Username.Text, Password.Text, nil, ACreatedObject);
ShowMessage('Account created');
end;
C++:
void __fastcall TForm1::btnCreateAccountClick(TObject *Sender)
{
TBackendEntityValue entity;
BackendUsers1->Users->SignupUser(Username->Text, Password->Text, NULL, entity);
ShowMessage("Account created");
}
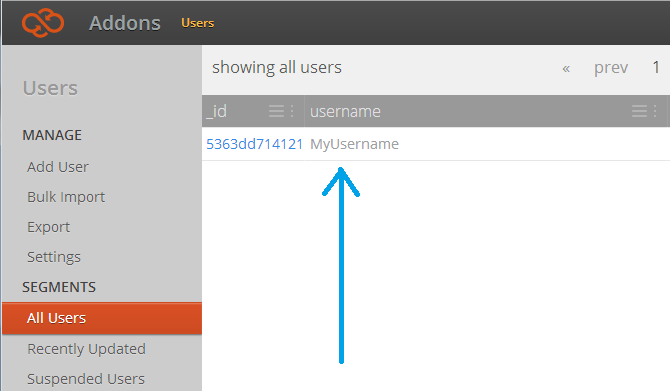
Below are some screenshots of my app in action: