The webinar for Building a Fast and Secure Mobile App Development Strategy is running right now. This blog post will have the replay and additional resources. If you missed the webinar on Android in 10.3 Rio, you may want to check it out for more information on permissions.
After the webinar is completed we will post the replay and Q&A here. (This is a draft post, and more is coming!)
One of the single most important concepts to understand in RAD Studio, Delphi and/or C++ Builder cross-platform development is the concept of styles. Styling is the cornerstone of the cross-platform FireMonkey architecture.
Styles are used at different levels. There are platform-specific, built-in styles that you use when you create a multi-device project and switch between styles in the form designer. FireMonkey controls on a form have a StyleLookup property, which can use a specific style for a given component. You can also apply a custom style using the TStylebook component. Finally, with the built-in style editor you can visually customize a given style item in the stylebook as easily as you would customize a component on the form. The key point with FireMonkey styles is you can build stunning graphical user interfaces!
With the RAD Studio, Delphi and/or C++ BUilder IDE, in the Designer, there is a Style combo-box where you can change the style that is used to preview the form you are working with.
With FMX, you can Stop Duplicating UI Work!
With other tools, an app developer might create an iOS user interface using the default vendor tools in Xcode and Swift, and an Android user interface in Android Studio and Java or Kotlin.
Despite being very similar, these efforts are entirely duplicated with no shared work. Even with other cross-platform solutions, the amount of shared work is limited. For example, Xamarin.Forms focuses on cross-platform development, but a lot of effort is duplicated since you need to interface in Swift (iOS) or Java (Android) to create anything non-standard.
With FireMonkey, a developer creates an interface once. Developers can easily make per application or per platform level application tweaks. For example: in the iOS version ensuring one control is presented using the native implementation; then in Android, adjusting spacing and colors for material design. The only language you need to use is Delphi or C++: all controls and UI interaction is in Delphi or C++, and you don’t need to mix languages or create translation layers. Just bring your existing Delphi or C++ code right into a native Delphi or C++ application.
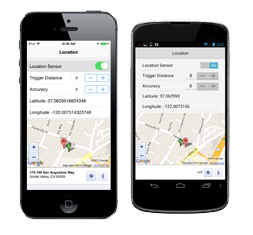
Here we see Native UI styling on Android and iOS with the ability to easily tweak button styles and much more.

Compared to other development tool vendors that only offer a small amount of controls, RAD Studio, Delphi and/or C++Builder include hundreds of controls that can be used in multi-device applications, and has a rich 3rd party ecosystem.
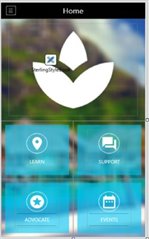
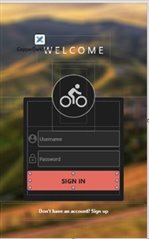
To help get us started with our FMX cross-platform UIs, you can use the included FMX GUI Templates; For example, the Home Screen and the Login Screen, as we see here:


The FMX GUI Templates are a set of UI template projects for FireMonkey in Embarcadero RAD Studio available via Embarcadero GetIt Package Manager.
You can access these Templates using Tools | Getit Package Manager, select Sample Projects Category.
For our sample FieldLogger mobile application we shown in the webinar, we installed the Home Screen and the Login Screen applications, that look like what we see on the images above.
The FMX GUI Templates serve as a great starting point for developers looking to build stunning cross-platform UIs, and can easily be customized by changing the images, iconography, styles and more.
The FireMonkey framework is the app development and run-time platform behind RAD Studio, Delphi and C++Builder.
FireMonkey is designed for teams building multi-device, true native apps for Windows, macOS, Android and iOS, and getting them to app stores and enterprises fast.
The different FMX GUI templates demonstrate responsive design in a variety of layout styles which makes it easy to design and customize your applications visually at design time.
The templates also use a variety of technologies like Frames, Styles, LiveBindings, and FireMonkey Effects which make it simple to build stunning UIs with RAD Studio, that provide an intuitive User Experience (UX).
There are six sets of FMX GUI templates, each set demonstrating a different type of UI, and three examples in each set for a total of eighteen. The templates are built using components like Frames, a container component, allowing you quickly create a reusable set of prebuilt UI components, which will let you easily incorporate the designs into your own projects.
Application security isn’t a feature or a benefit – it is a bare necessity. One breach in security could cost your company not just millions of dollars but a lifetime of trust. That is why security needs to be a priority from the moment you start writing the first line of code.
For our application security for Login authentication, we can use the strong password protection provided by our embedded InterBase database. InterBase’s password protection supports a password length of 32 bytes, and a password algorithm using a modern cryptographic hash function. This all means we have additional functionality using the embedded InterBase database for supporting a longer effective password length, that results in stronger password protection.!
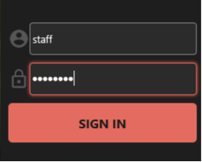
Using our FMX GUI UI template for Login Screen, we need to enter the Username and Password of our IBlite database to login (authenticate) our Application.
In our InterBase IBlite database, we created two new users for our IBlite database; staff and manager. This allows role based Authorization to the applications features, and database access permissions!
To authenticate against the Username and Password for the InterBase IBLite database, we can use this code for the OnClick Event of the Sign In button:
procedure TForm2Login.LoginFrame21SignInRectBTNClick(Sender: TObject) begin dmIBLite.DataModule1.FDConnectionIBLite.Params.Values['USER_NAME'] := LoginFrame21.UsernameEdit.Text dmIBLite.DataModule1.FDConnectionIBLite.Params.Values['Password'] := LoginFrame21.PasswordEdit.Text try Begin dmIBLite.DataModule1.FDConnectionIBLite.Connected := True uLoginForm2.Form2Login.Hide //Hide the Login Screen. uCamera.Form1.Show //Show the next Form, the Camera Form. End
For the FieldLogger application we shown in this webinar, we created a uProjectsTypes unit where we can add data types for the Projects that are shared between the user interface and the data access module. This gives us a level of separation between the user interface and the data access logic.
The Data Model looks like this:
unit uProjectsTypes interface uses System.Generics.Collections type TProject = record Proj_Id: integer Proj_Title: string Proj_Desc: string end TProjects = TList<TProject>; implementation end.
And for this Data Model we defined an interface for communication between the two tiers of the application.
The data module will implement it and the Data Capture Forms of the application will use this interface as the only way to communicate with the data module.
This gives us a pluggable architecture.
This way our UI can be developed independently and we can provide different implementations of data access logic without affecting the rest of the application.
This way, our app could be using different types of embedded databases, a different data access framework, or maybe we would want later to switch to storing our data in a plain file or in cloud storage.
Notice on our Data Model we also implemented a generic list of Projects items. This will be useful to return the list of all Projects items from the data module.
After we defined our Data Model, we define the standard operations that the data module should provide, using an Interface like this:
IProjectsData = interface function ProjectsCreate(aValue: TProject): integer function ProjectsRead(id: integer out aValue: TProject): boolean function ProjectsUpdate(id: integer aValue: TProject): boolean function ProjectsDelete(id: integer): boolean procedure ProjectsList(aList: TProjects) end
The standard CRUD operations are Create, Read, Update, Delete, and List.
In our FieldLogger Application, these operations got implemented by five different methods.
The interface code above declares a new interface type called IProjectsData that defines what functionality our data module should offer.
9. HTML Reporting
- Reporting Requirements
- Working with Android Permissions
- Resizing Images
- Embedding Images in HTML
- (Single file for sharing)
- Building & Displaying
- Sharing via Email
- Android FileProvider
Requirements
- Requirement:
- A single file that contains images and text
- Doesn’t require any 3rd party components
- Work on all platforms
- Viewable without a special viewer
- Share via email
- In the real world
- You would most likely use a reporting package or PDF generator
- There are a lot of great options from Tech Partners
Embedding Images in HTML: Data URI Scheme
- Traditional HTML references other documents via URI
- The Data URI Scheme allows embedding “external” data in a URI
- Defined in Request for Comments (RFC) 2397 [August 1998]
- data:[<media type>]<data>
- Example:
- <img src=“data:image/pngiVBORw0KGgoAAAANSUhEUgAAAAUAAAAFCAYAAACNbyb
lAAAAHElEQVQI12P4//8/w38GIAXDIBKE0DHxgljNBAAO9TXL0Y4OHwAAAABJRU5ErkJggg==“/>
- <img src=“data:image/pngiVBORw0KGgoAAAANSUhEUgAAAAUAAAAFCAYAAACNbyb
- Base64 has roughly a ⅓ overhead, and images are big to begin with!
Simple Delphi Example
uses System.NetEncoding, System.Classes
//....
var
  blob: TStream
  jpeg: TBitmap
  html: TStringList
  jpegBytes: TByteDynArray
  imageAltText: String
//....
  html := TStringList.Create
  blob := field.DataSet.CreateBlobStream(field, TBlobStreamMode.bmRead)
  SetLength(jpegBytes, blob.Size)
  blob.Read(jpegBytes[0], blob.Size)
  blob.Position := 0
  html.Add(format('<img src="data:image/jpg;base64,%s" alt="%s" />',
  [TNetEncoding.Base64.EncodeBytesToString(jpegBytes),
   TNetEncoding.HTML.Encode(imageAltText)]))
//....
  WebBrowser1.LoadFromStrings(html.Text, 'about:blank')
Resizing a JPEG Image from a Field
function ResizeJpegField(const field: TBlobField const maxWidth: integer): TByteDynArray
var
  blob: TStream
  jpeg: TBitmap
begin
  Assert(Assigned(field))

  blob := nil
  jpeg := nil
  try
    blob := field.DataSet.CreateBlobStream(field, TBlobStreamMode.bmRead)
    jpeg := TBitmap.Create
    jpeg.LoadFromStream(blob)
    blob.DisposeOf
    if jpeg.Width > maxWidth then
      jpeg.Resize(maxWidth, Trunc(jpeg.Height / jpeg.Width * maxWidth))
    blob := TMemoryStream.Create
    jpeg.SaveToStream(blob)
    blob.Position := 0
    SetLength(result, blob.Size)
    blob.Read(result[0], blob.Size)
  finally
    jpeg.DisposeOf
    blob.DisposeOf
  end
end
First Let’s Talk Android’s New Permission Model
- 10.3 Rio supports the new Android Permission Model
- Still define permissions in Project Options
- Also, request individual permissions before use
- Required for all new apps in Google Play Store
and on Android starting with 9/Pie - Use the System.Permissions unit
- Request: PermissionsService.RequestPermissions
- Check: PermissionsService.IsPermissionGranted
- Learn more:
Android FileProvider
more to come . . . .
