Welcome back! This is the third post on a series on practical UI design, an approach to creating usable, good-looking UIs when you are not a UX expert.
In Part 1, we looked at some basic principles of UI design, a typical UI design workflow, what it means for a UI to be ‘intuitive’, some examples, and started with an example ‘bad’ UI that could be a first cut at a UI for a feature, or the first version of a mockup.
In Part 2, we moved into a practical approach, and examined confusion from users’ eyes. Using the ‘bad’ UI, we asked questions about it, several of which led to changes in the UI. These changes were only functional: they changed what the UI did, or what data it presented, but did not focus on how the dialog looked.
This post, Part 3, will be the last in the series for a while — although there are several followon topics. In this post, we’ll improve how data is presented and how the controls interact with each other and with the user. We’ll also examine making the dialog look more standard on Windows, such as layout and form behaviour, plus a ‘recipe’ for things to do when implementing a dialog. We’ll also, as a brief aside, examine the role of specific controls and when to use them. Then we’ll have another aside, about the role of animations in UIs. Finally, applying all these, we’ll have the final UI. Will it be great? It may not be flashy, but it will be clear, modern, elegant, and usable.
Control interaction and data presentation
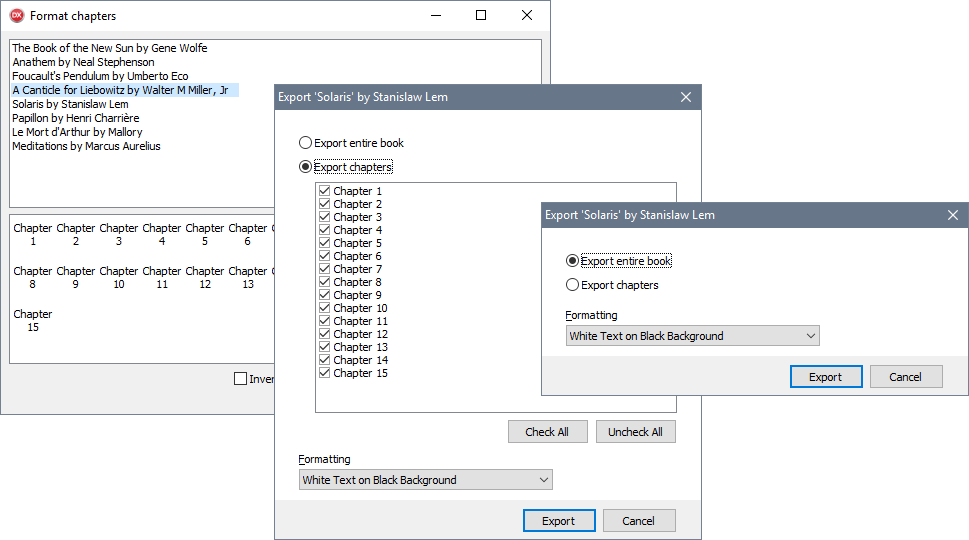
Last time, we got to this ugly-looking, but more functionally understandable, dialog:
Here, the UI controls are clear in function (their purpose), but there are improvements we can make in how the interact with each other and how data is presented.
Control interactions
One goal is to reduce uncertainty. A control that can be interacted with is potentially a control that should be interacted with. (‘Surely it’s there for a reason?’)
In addition, controls should represent the choices a user has made. This provides confirmation to them that their choice is being applied.
We have two reasons now to modify controls: to clarify applicability, and to confirm interaction.
Controls can be modified in all sorts of ways, right up to removing them – usually a bad choice, because a control vanishing is surprising, violating our principles of reducing surprise. But one common change, especially on desktops, is to disable a control. This typically draws it gray or flat, or with some other visual indication that it’s there but cannot currently be interacted with.
A good time to enable or disable controls is in response to state changes, such as what’s selected or chosen. What controls in the UI above change applicability (are they of use or not?) based on choices the user has made?
There are two sets of controls:
- The chapter list. Selecting chapters is only applicable when the user has chosen that they want to export specific chapters, not the whole book. When exporting the entire book, the chapter list and the Check All and Uncheck All buttons should be disabled.
- A further tweak here would be to enable Check All only when not all chapters are checked, and Uncheck All only when there is at least one chapter checked. Otherwise, they are available when clicking them will have no effect. Not only is this useless, but their availability implies to the user that there is a reason they are enabled, ie, Check All being enabled implies that there is at least one chapter unchecked. If this is not true, a user, comparing the button and scrolling through the chapter list to find any unchecked chapters, may become confused.
- The Export button. This should only be enabled when there is something to export. That’s true most of the time, but there is one situation when there is nothing to export: when the user is exporting only specific chapters, and has not selected any of them.
Implementing enabling and disabling these controls is another action item.
Data presentation
A UI is all about data. Data is what it shows. You may feel yours don’t, if you are just presenting options to a user or not working on a complex app, but ‘data’ just means information. A UI is redolent with information. The book we’re exporting is information. The chapters it has are information. Choices the user makes, such as exporting the whole book vs some chapters, are information. Actions, like ‘Export’, are information.
In part 2, we examined the dialog while asking questions, and the answers to those questions reduced uncertainty and reduced confusion. Presenting information to the user is a good way to reduce uncertainty. You do not want to present unnecessary or redundant information, but present what is useful to know, or what a user may ask.
Here, one question we cannot answer from what’s displayed in the dialog is, What book is being exported?
Before seeing this dialog, the user will have selected a book or books and then invoked this dialog. Although that was likely only seconds ago, confirming their selection, or showing it if they are returning to the app after some time, is useful. The book being exported is extremely pertinent to the purpose of this dialog, which is to export that book. Therefore, it is good information to display.
You could show that information in multiple places. One option is a label at the top, perhaps above the radio buttons. However, we will show it in the title bar. The title bar of a dialog names the purpose of the dialog, and the purpose of this dialog is to export a book. (Note it currently says ‘Format chapters’, which is not accurate.) Our action item is to title the dialog, Export ‘Book Name’, such as Export ‘A Canticle for Liebowitz’.
Applying UI standards and design
We now come to the section that has the greatest impact on the UI’s look. This series has deliberately left the visual side of UI design until last, and that’s for an important reason: good UI design isn’t only about looks. The function, purpose, and flow of a UI should be designed first.
However, looks are important. Not only for consistency with the target platform, but also to look attractive. People judge by looks, even unconsciously, and presenting a UI that looks well designed will positively impact your user’s perception of your application.
We’ll examine two areas: standard dialog behaviour you should always apply, and some tips for designing a ‘modern’-looking dialog.
Modern Design
Recent design trends are often characterized as ‘flat’, and that is true: there is a lot of removal of 3D borders and, sometimes more concerningly, indications of interactivity. Depending on the platform, there are a range of other ‘modern’ trends: single color UIs or icons, small shadows to replace previous 3D bevels, semitransparency, removal of gray backgrounds in favour of white or other solid colors, etc. These are platform-specific.
But modern design has another aspect, specifically, use of space. Increasingly, UI elements have larger boundaries between them. Spacing is useful for ‘relaxing’ a UI: a cramped UI evokes frustration. It is also useful for denominating related areas without using explicit border lines. Sometimes, different areas have different spaces, and borders are now no longer denoted with lines, but by colored areas.
Let’s look at this for a typical modern Windows dialog. A typical Windows dialog has a white background, not gray. In practice, this means clWindow, not clBtnFace. Items inside will have a large border between them and the dialog edge, and will be well-spaced between each other. It also has a separately colored area at the bottom for buttons. Here, clBtnFace can be used, as could any other light accent color.

You can implement the button panel with a TPanel with ParentBackground and ParentColor set to false, and its own Color to clBtnface. Place buttons and anchor them right (more on this in the recipe below.)
Recipe: a checklist for dialogs
To achieve a standard-looking and behaving dialog, in the VCL designer, follow these steps:
- BorderStyle: bsDialog. This changes the title bar look and gives it only an X button
- Color: clBtnFace (default, old style) or clWindow (modern)
- Position: poOwnerFormCenter. If, when shown, it is owned by the form the user is currently using, this will pop up your dialog over the middle of that window. Also try poMainFormCenter.
- Buttons:
- Main ‘Ok’ button (or similar, such as Export):
- Default: true. This invokes it when the user presses Enter
- ModalResult: mrOk. This allows you to test what button was used to close the dialog, from code that shows the dialog with ShowModal
- Cancel button:
- Cancel: true. This invokes it when the user presses Escape
- ModalResult: mrCancel
- Buttons are not centered at the bottom, but are on the bottom right of the dialog. Indent at least 20 pixels from the right hand edge. Use Anchors to anchor them right, not left.
- Main ‘Ok’ button (or similar, such as Export):
- Ensure default options are checked, selected, etc by default
- Check the tab order. Right-click on each owner control (the form itself, and panels) and select ‘Tab Order…’. Ensure tab order goes, roughly, left to right, top to bottom. The panel with Ok and Cancel buttons should be last.
- Place labels above controls, not to the left of them. (See the ‘Formatting’ label in the final dialog design.) This is a more modern style. It also assists internationalization, as you don’t have to worry if there is space for translated text.
- Add keyboard shortcuts for controls: an Alt+(Key) combination that sends focus to the control. To do this, in the label for a control, add an ampersand before the key. For example, ‘&Formatting’ will use F. F will be drawn underlined by Windows when the Alt key is held down. Then, set the FocusControl property to the control that should be focused.
- Spacing:
- Place controls indented at least 24 pixels from the left, top, and right edges of the form
- Use a multiple of 4 for spacing: for example, controls may have a 4px, 8px, etc gap between them, and be placed and sized to multiples of 4. The exception are buttons, which are 75×25 by default.
- For related controls, have a 4px gap between them vertically, 8px horizontally. See the chapter like, and Check All and Uncheck All buttons: 4px vertically between the list control and buttons; 8px spacing between buttons.
- Indent controls underneath radio buttons or checkboxes, or other controls, that affect them. For example, the chapter list is indented under the radio button that enables it. To align with the text in a radio button or checkbox, indent by 16px.
- Align controls visually, especially at their left and right edges. For example, the Ok and Cancel buttons on the bottom will be indented by 24px from the right hand edge. Controls in the main area of the form will also be indented 24px, and will visually line up
- Make use of the Alignment and Anchor controls.
- Alignment makes a control stick to, and fill up, an edge or the center of its parent control. This is useful for parent controls like panels, or large controls like edit boxes or lists.
- Use the AlignWithMargins and then Margins properties liberally. These are excellent for applying spacing. They are also useful for making a control stick to the top (say) of a form, but with a large margin other controls can float in.
- Anchoring doesn’t make a control fill an area, but makes it stick to an edge with the same distance. For example, something anchored right will stay the same distance from the right edge of the form when the form is resized. You can anchor to both left and right to have both sides stick, and the control change size
You can use this as a checklist for all dialogs.
Applying Changes
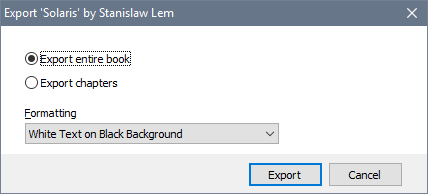
After applying all the above, this is our UI:
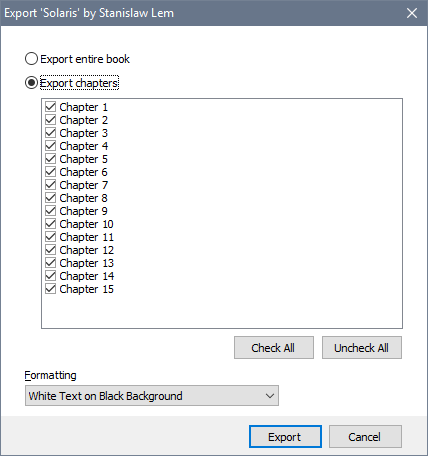
A major change from the original draft or mockup we started with. It is not flashy, but it is usable, clear, matches our platform (Windows) well, has some modern design cues, and is a vast improvement. You too can improve your dialogs by following the steps and recipes in this series.
The role of animation in UI design, and a controversial tweak
Animations are useful for attracting attention to an area. For example, in the Parnassus Bookmarks plugin (disclosure: I wrote it), when you add or remove a bookmark in the code editor there is an animation showing it appear on the side, or showing it vanish. This is a visual clue indicating its location, and also visual confirmation of the user’s interaction, which is invoked by a shortcut key and has no other visual response.
Animation can similarly indicate a change in state – again, movement used to catch the user’s eye and to draw attention to something important. If state changes, a visual transition can also reduce surprise, because the change from one state to another is visible rather than instantaneous.
Animation can be annoying if overused. This is Skype for Mac during a Skype call, where an emoji icon constantly animates:

It doesn’t stop animating, changing size, until the entire set of UI widgets fades away. It just needlessly pulses catching your eye. Don’t be like that!
Controversial UI tweak
In the ‘Control Interactions’ section we disabled the chapter list when the user chose to export the whole book. Let us suppose that we analyse user’s usage of the dialog (something we haven’t discussed much, but is important) and it indicates that 95% of the time, users export a whole book. Exporting individual chapters is rare. There are a number of possible responses to that, including making this dialog handle whole-book exports only, but for the sake of demonstrating a potentially controversial change, let’s assume we keep the dialog as is.
Instead of disabling the chapter list, we can hide it, and only display it when the user chooses the radio button. When hidden, the space it takes up would be blank, so hiding it implies the dialog size should be changed to be considerably less tall, and so the dialog as a whole will change size when the user clicks each one of the radio buttons.
This violates the principle of not surprising the user. It is not normal for dialogs to resize on Windows.
However, animation including sizing and showing/hiding elements is slowly becoming more accepted on Windows, especially in Fluent Design apps. So let’s implement it in this dialog. When the dialog is shown, the option to export the whole book is chosen (as it is the most common choice) and the dialog is collapsed. It expands when the other radio button is chosen.
It is essential, if you implement something like this, that the dialog resize is not instantaneous. Show the user the change. That is, smoothly animate the resize. Transitions are their own complex topic, but do not animate linearly: implement a transition that eases in and eases out, so it is visually a smooth transition. (I have my own VCL animation library I’d like to release soon; Jon Aasenden has one too, and there is the previous link.)
Final words
There are some common themes running through this series. When we changed the dialog title, we gave pertinent information, and reduced potential uncertainty for our user about what book they were exporting. When we changed control interaction, we used common UI patterns like disabled controls to make it clear what could be interacted with and what the workflow within the dialog is, again reducing uncertainty. In part 2, we dedicated almost an entire blog post to asking questions about the dialog, especially around its purpose and function, to reduce confusion.
I am sometimes asked what I believe good UI design is. It’s not just aesthetics, although pleasant visuals are good. The most fundamental goal of good UI design is: Reduce uncertainty; add clarity.
This has been a practical guide, but with that as your goal, you can achieve 99% of good UI design with ease.