[See the full index of articles for more information]
Table of Contents
- The EMSDataSetResource Component
- Test the RAD Server application
- Create VCL client application using the EMSDataSetResource endpoint functionality
- Additional Information
1 The EMSDataSetResource Component
The new EMSDataSetResource component allows for greater control of the data retrieved by desktop, multi-device, web and other service-based applications that connect to your RAD Server application. Using this new component RAD Server applications can provide access all of a data set’s data, a specific page of data, updating a data set record, creating a new data set record, and deleting a data set entry.
EMSDataSetResource provides the following useful properties:
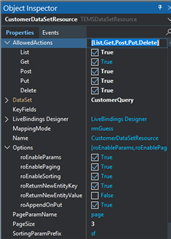
- AllowedActions – provides built in actions for List, Get, Post, Put, and Delete endpoints.
- DataSet – connect to a data set: Query, Table or other data set.
- KeyFields – choose data set fields that must be matched when doing a lookup.
- PageParamName – contains a string that defines the paging REST request query for the URL, for example?page=2.
- PageSize – allows the Get endpoint to return a page of JSON containing a specific number of rows.
- SortingParamPrefix – text string that will be pre-pended to a data set ValueFields entry.
- ValueFields – choose data set fields to use in a parameterized query and also to appear in the JSON response
- Options – sub-property settings to enable/disable param use, row paging, data set field sorting, etc.
Figure 1: Object Inspector showing the EMSDataSetResource properties
Use the RAD Server Package Wizard to create a resource based RAD Server package. Set the Resource name to FireDAC and set the File type to DataModule. Choose the Get endpoint and click the Finish button to complete the wizard to create your project.
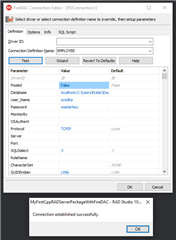
Add a FireDAC database TFDConnection component to the resource module. Bring up the FDConnection connection editor with a right mouse click on the component. Connect the FDConnection to the InterBase Employee.gdb sample database. Click the Test button to verify the connection.
Figure 2: FireDAC Connection Editor using the Employee.gdb database
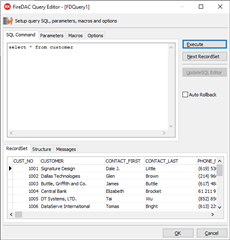
Add an FDQuery component to the resource module. Right mouse click on the component to bring up the Query editor. Type in the SQL statement “select * from customer” and click the Execute button to test the query.
Figure 3: FireDAC Query Editor – select * from customer
Set the FDQuery component’s Name property to CustomerQuery. Add a TFDSchemaAdapter component, set the Name property to CustomerSchemaAdapter and set the CustomerQuery component’s SchemaAdpater property. Add a TstanStorageJSONLink component.
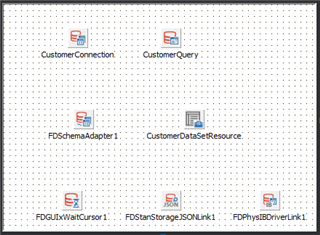
Add an EMSDataSetResource component to the server module and change its name to CustomerDataSetResource.
Figure 4: RAD Server application resource module showing the EMSDataSetResource component
Set the AllowActions property check boxes for List and Get. Set the DataSet property to the CustomerQuery. Set the PageSize property to 3.
For the CustomerQuery, change the SQL property to provide a sorting capability using EMSDataSetResource’s SortingParamPrefix + ValueName properties.
select * from customer
{IF &SORT} order by &SORT {FI}
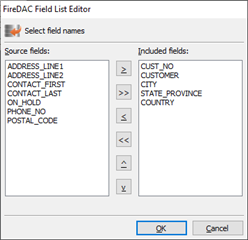
In the Object Inspector for the CustomerDataSetResource use the ValueFields property Field List Editor to select CustomerQuery columns to support sorting and return in the JSON response.
Figure 5: CustomerDataSetResource ValueFields property fields list editor with selected query fields
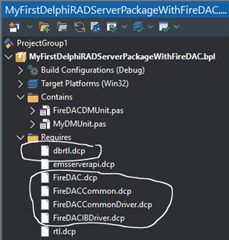
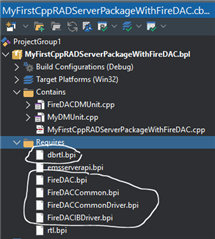
Before you compile and run the application server, add a few FireDAC libraries to the Requires section of your project. Right mouse click on the Requires section and choose the Add Reference… pop-up menu item. Navigate to the C:\Program Files (x86)\Embarcadero\Studio\20.0\lib\win32\release folder and multi-select the dbrtl, FireDAC, FireDACCommon, FireDACCommonDriver and FireDACIBDriver files and click the OK button.
Figure 6: Delphi project window with the required FireDAC database libraries and Figure 7: C++ project with the rquired FireDAC database libraries
For the Delphi version of the RAD server application, add resource suffixes before the declaration of the DataSetResource in your RAD Server application’s resource module:
[ResourceName('DataSetResource')] TDataSetResourceResource1 = class(TDataModule) CustomerConnection: TFDConnection; FDStanStorageJSONLink1: TFDStanStorageJSONLink; FDGUIxWaitCursor1: TFDGUIxWaitCursor; FDSchemaAdapter1: TFDSchemaAdapter; FDPhysIBDriverLink1: TFDPhysIBDriverLink; CustomerQuery: TFDQuery; [ResourceSuffix('list', '/')] [ResourceSuffix('get', '/{CUST_NO}')] CustomerDataSetResource: TEMSDataSetResource; published end</span>; |
For C++, add code in the RAD Server package’s Register function to place resource suffixes in the attributes for the EMSDataSetResource List and Get endpoints:
static void Register() { std::auto_ptr<TEMSResourceAttributes> attributes( new TEMSResourceAttributes()); attributes->ResourceName = "DataSetResource"</span>; attributes->ResourceSuffix["CustomerDataSetResource.List"] = "/"</span>; attributes->ResourceSuffix["CustomerDataSetResource.Get"] = "/{cust_no}"</span>; RegisterResource(__typeinfo(TDataSetResourceResource1), attributes.release()); } |
In both of the above source code examples the {cust_no} string is used for the Get endpoint suffix to match the primary index column name for the Customer table. If you use a different database and table set the suffix to the name of that table’s primary index column or columns.
2 Test the RAD Server application
Run the RAD Server application. You will see a RegResource entry in the log for the DataSetResource.
Figure 8: RAD Server application log with DataSetResource endpoints defined
Click the Open Browser button and try the following URLs.
1) Get a JSON array for all rows of data: localhost:8087/DataSetResource
Figure 9: DataSetResource List endpoint JSON response with selected ValueFields
2) Get the JSON for a specific customer: localhost:8087/DataSetResource/1002
Figure 10: DataSetResource Get endpoint JSON response for a specific CUST_NO
3) Get the JSON for the first page of data: localhost:8087/DataSetResource?page=1
Figure 11: DataSetResource List endpoint called with parameter for the first page
4) If you go beyond the # of pages of data that are available the DataSetResource will return a null JSON array: localhost:8087/DataSetResource?page=100
Figure 12: DataSetResource List endpoint called with page parameter past end of data set
5) Use the SortingParamPrefix string with a Field Name to return a JSON response array sorted by Customer in ascending order: localhost:8087/DataSetResource?sfCustomer=A
Figure 13: DataSetResource List endpoint called with JSON array response sorted by Customer in ascending order
6) Use a combination of URL parameters to return a JSON response array sorted by Country (descending order), State_Province (ascending order), City (ascending): localhost:8087/DataSetResource?sfCountry=D&sfState_Province=A&sfCity=A
Figure 14: DataSetResource List endpoint called with JSON array response for multiple sorted Customer fields
3 Create VCL client application using the EMSDataSetResource endpoint functionality
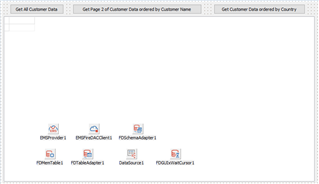
Create a VCL (or a multi-device) client application that uses the same EMSDataSetResource endpoint functionality. Create a starting client project with the following components.
Figure 15: VCL client application components and UI
Connect the components and set the properties. Add 3 buttons and a DBGrid. Connect the DataSource to the FDMemTable. Use the DataSource for the DBGrid. The following are some of the property settings used in the client application.
object EMSProvider1: TEMSProvider ApiVersion = '2' URLHost = 'localhost' URLPort = 8087 end object EMSFireDACClient1: TEMSFireDACClient Provider = EMSProvider1 SchemaAdapter = FDSchemaAdapter1 Resource = 'DataSetResource' end object FDMemTable1: TFDMemTable FetchOptions.AssignedValues = [evMode] FetchOptions.Mode = fmAll ResourceOptions.AssignedValues = [rvSilentMode] ResourceOptions.SilentMode = True UpdateOptions.AssignedValues = [uvCheckRequired, uvAutoCommitUpdates] UpdateOptions.CheckRequired = False UpdateOptions.AutoCommitUpdates = True Adapter = FDTableAdapter1 end object FDTableAdapter1: TFDTableAdapter SchemaAdapter = FDSchemaAdapter1 DatSTableName = 'CustomerQuery' end |
Write code for the button click event handlers.
Delphi:
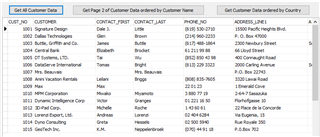
procedure TForm2.Button1Click(Sender: TObject); begin // get all customers EMSFireDACClient1.GetEndpoint.Params.Clear(); EMSFireDACClient1.GetData(); end</span>; procedure TForm2.Button2Click(Sender: TObject); begin // get page 2 of customers ordered by Customer name EMSFireDACClient1.GetEndpoint.Params.Clear(); EMSFireDACClient1.GetEndpoint.Params.AddItem( 'page', '2', TRESTRequestParameterKind.pkQUERY); EMSFireDACClient1.GetEndpoint.Params.AddItem( 'sfCustomer', 'A', TRESTRequestParameterKind.pkQUERY); EMSFireDACClient1.GetData; end</span>; procedure TForm2.Button3Click(Sender: TObject); begin // get all customers ordered by Country EMSFireDACClient1.GetEndpoint.Params.Clear(); EMSFireDACClient1.GetEndpoint.Params.AddItem( 'sfCountry', 'A', TRESTRequestParameterKind.pkQUERY); EMSFireDACClient1.GetData; end</span>; |
C++:
void __fastcall TForm1::Button1Click(TObject *Sender) { // get all customers EMSFireDACClient1->GetEndpoint->Params->Clear(); EMSFireDACClient1->GetData(); } //--------------------------------------------------------------------------- void __fastcall TForm1::Button2Click(TObject *Sender) { // get page 2 of customers ordered by Customer name EMSFireDACClient1->GetEndpoint->Params->Clear(); EMSFireDACClient1->GetEndpoint->Params->AddItem( "page", "2", TRESTRequestParameterKind::pkQUERY); EMSFireDACClient1->'GetEndpoint->Params->AddItem( "sfCustomer", "A", TRESTRequestParameterKind::pkQUERY); EMSFireDACClient1->GetData(); } //--------------------------------------------------------------------------- void __fastcall TForm1::Button3Click(TObject *Sender) { // get all customers ordered by Country EMSFireDACClient1->GetEndpoint->Params->Clear(); EMSFireDACClient1->GetEndpoint->Params->AddItem( "sfCountry", "A", TRESTRequestParameterKind::pkQUERY); EMSFireDACClient1->GetData(); } |
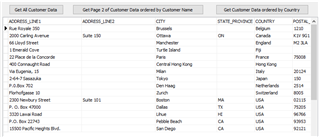
Figure 16: Client UI after clicking Button1 – all customer data ordered by Primary Key CUST_NO
Figure 17: Client UI after clicking Button2 – page 2 of Customer data ordered by Customer name
Figure 18: Client UI after clicking Button3 – all Customer data sorted by Country
4 Additional Information
EMS Client Application
http://docwiki.embarcadero.com/RADStudio/en/EMS_Client_Application
Tutorial: Implementing Your First EMS Client Application (using BackendEndpoint)
http://docwiki.embarcadero.com/RADStudio/en/Tutorial:_Implementing_Your_First_EMS_Client_Application
Tutorial: Implementing a FireDAC EMS Client Application (using EMSFireDACClient)
http://docwiki.embarcadero.com/RADStudio/en/Tutorial:_Implementing_a_FireDAC_EMS_Client_Application
Marco Cantu blog: New RAD Server Features in RAD Studio 10.3
https://community.idera.com/developer-tools/b/blog/posts/new-rad-server-features-in-rad-studio-10-3
Helper Components for JSON Processing
http://docwiki.embarcadero.com/RADStudio/en/Using_RAD_Server_Components#Helper_Components_for_JSON_Processing
