


Creating PDF Reports in RAD Server
Reporting is a critical aspect of any enterprise application, but the data and the programming components to create reports are not always available on all platforms?
It took a little trial and error to work out the best path to create reports via RADServer using the components out the box. In this post, I will share what I have learned along the way.
Reporting Components
The obvious answer to generating a report that can show on mobile is to create a report PDF report remotely download the PDF to the client over REST. But which version and platforms can be used?
Fast Reports (Embarcadero Edition), which is included in RAD Studio, provides everything we need to create a report and save it out to PDF for export.
Fast Reports – VCL or FMX?
There are two versions of Fast Reports, one for the Visual Component Library (VCL) and one for FireMonkey (FMX). The major differences here are that VCL is Windows only, but also importantly, it has an Exporter component for generating a PDF output.
Even though it is possible to print via an installed printer to PDF via FMX on macOS, it isn’t possible to silently do this without interaction. For this reason, VCL components were the way to go.
Stage 1 – Creating a prototype report
Once decided on the components to use, the next step is to build a sample report, that can then be embedded into the RAD Server module later on.
The approach I decided to take to prototype, was to create a single form VCL application, with a button and Lookup List for the exams, that enabled me to test the report generation with different parameters. This also enabled me to keep everything confined as I would do in the RAD Server resource later.
I won’t cover report creation here, I would, however, recommend Cary Jensons CodeRage X video on Fast Reports if you are new to them.
Stage 2 – Export to PDF
Because the ultimate target here is run inside RAD Server, the next step, once the report is creating, is to ensure it generates the PDF silently.
To do this, we need to add a TFmxPDFExport component to the form. Using this, you can set the Author and Subject, set Protection Flags for the PDF. There are a number of other options to set, including ShowDialogs, OverwritePrompt, OpenAfterExport (All which I set to False) and Background (which I set to true). I’ve not played around much further with these settings, but this worked for me.
With the export settings configured, I used the following code to initiate a test export. Note… this uses a SaveDialog to provide a file name, which will need to be refactored out later for a temp file name. I could have hardcoded a filename, but this enabled better testing and comparison of outputs and enabled simpler testing at this point.
procedure TForm1.Button1Click(Sender: TObject);
var
  LReportStream: TStream;
begin
  // Get a test file name to test against
  if not SaveDialog1.Execute then
    Exit;

  // Select the exam from available list
  ExamTable.Close;
  ExamTable.ParamByName('EXAM_ID').Value := DBLookupListBox1.KeyValue;
  ExamTable.Open();
  LReportStream := TFileStream.Create(SaveDialog1.FileName, fmCreate or fmShareDenyNone);
  try
    frxPDFExport1.Stream := LReportStream;
    // Generate the report
    frxReport1.PrepareReport(True);
    // Export the report
    frxReport1.Export(frxPDFExport1);
  finally
    // free the file stream object
    FreeAndNil(LReportStream);
    frxPDFExport1.Stream := NIL</strong>;
  end</span>;
end</span>;
The key point here is setting the Stream property on the export to our TFileStream. This then ensures it creates where we desire.
Stage 3 – Converting silent FastReport into RAD Server REST Resource
At this point, we have a report that creates silently (except for the one dialog we are using for testing). This now needs to be converted into a RAD Server Resource.
In summary, the next steps are to
- Create a RADServer Resource Module,
- Copy over the required components,
- Create a REST entry point for calling the method to export the report
- Finalizing the code
In practice, this means a little more refactoring. Firstly to remove the reliance on the file dialog, and also to set up the resource entry.
Stage 3.1 – Creating the RADS Server Resource Module
Using File > New > Other > {select your language} > RAD Server, select to create a new RAD Server Module. (and create an empty one). I used the ResourceName “Reports” for mine, but you can change this later.
Stage 3.2 – Copying over the components
It’s now time to copy over the components ready for use in the REST call. The first issue you will discover when copying over the Report components from the prototype applications is an Error dialog saying “Class TFrxReport not found.”
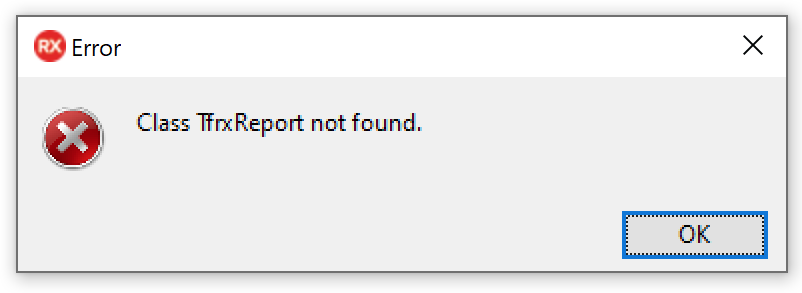 This is caused by the TDataModule.ClassGroup defaulting to System.Class.TPersistent. This needs to be changed to VCL.
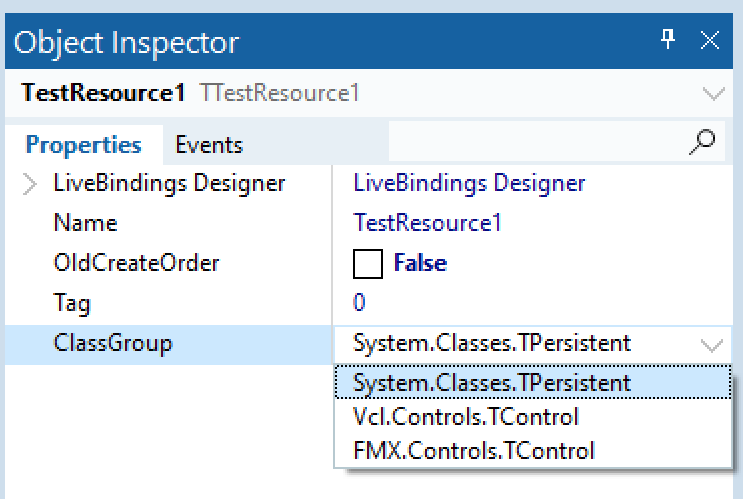
You can now copy and paste in your database components and report components from the prototype application.
The second issue is that this will not compile! Yes, you read that right! No code, just a few components, and this will not compile!
Because we have introduced VCL components to the package, we need to ensure that the pathing for the BPL’s in VCL are now available. This is an important impact, as (as touched on earlier) this binds the package being created to VCL and Windows only.
To make this compile, open the project options (Project > Options, or Shift + Ctrl + F11). Under “Build > Delphi Compiler > Unit scope names”, add in “VCL”, choose Add and OK
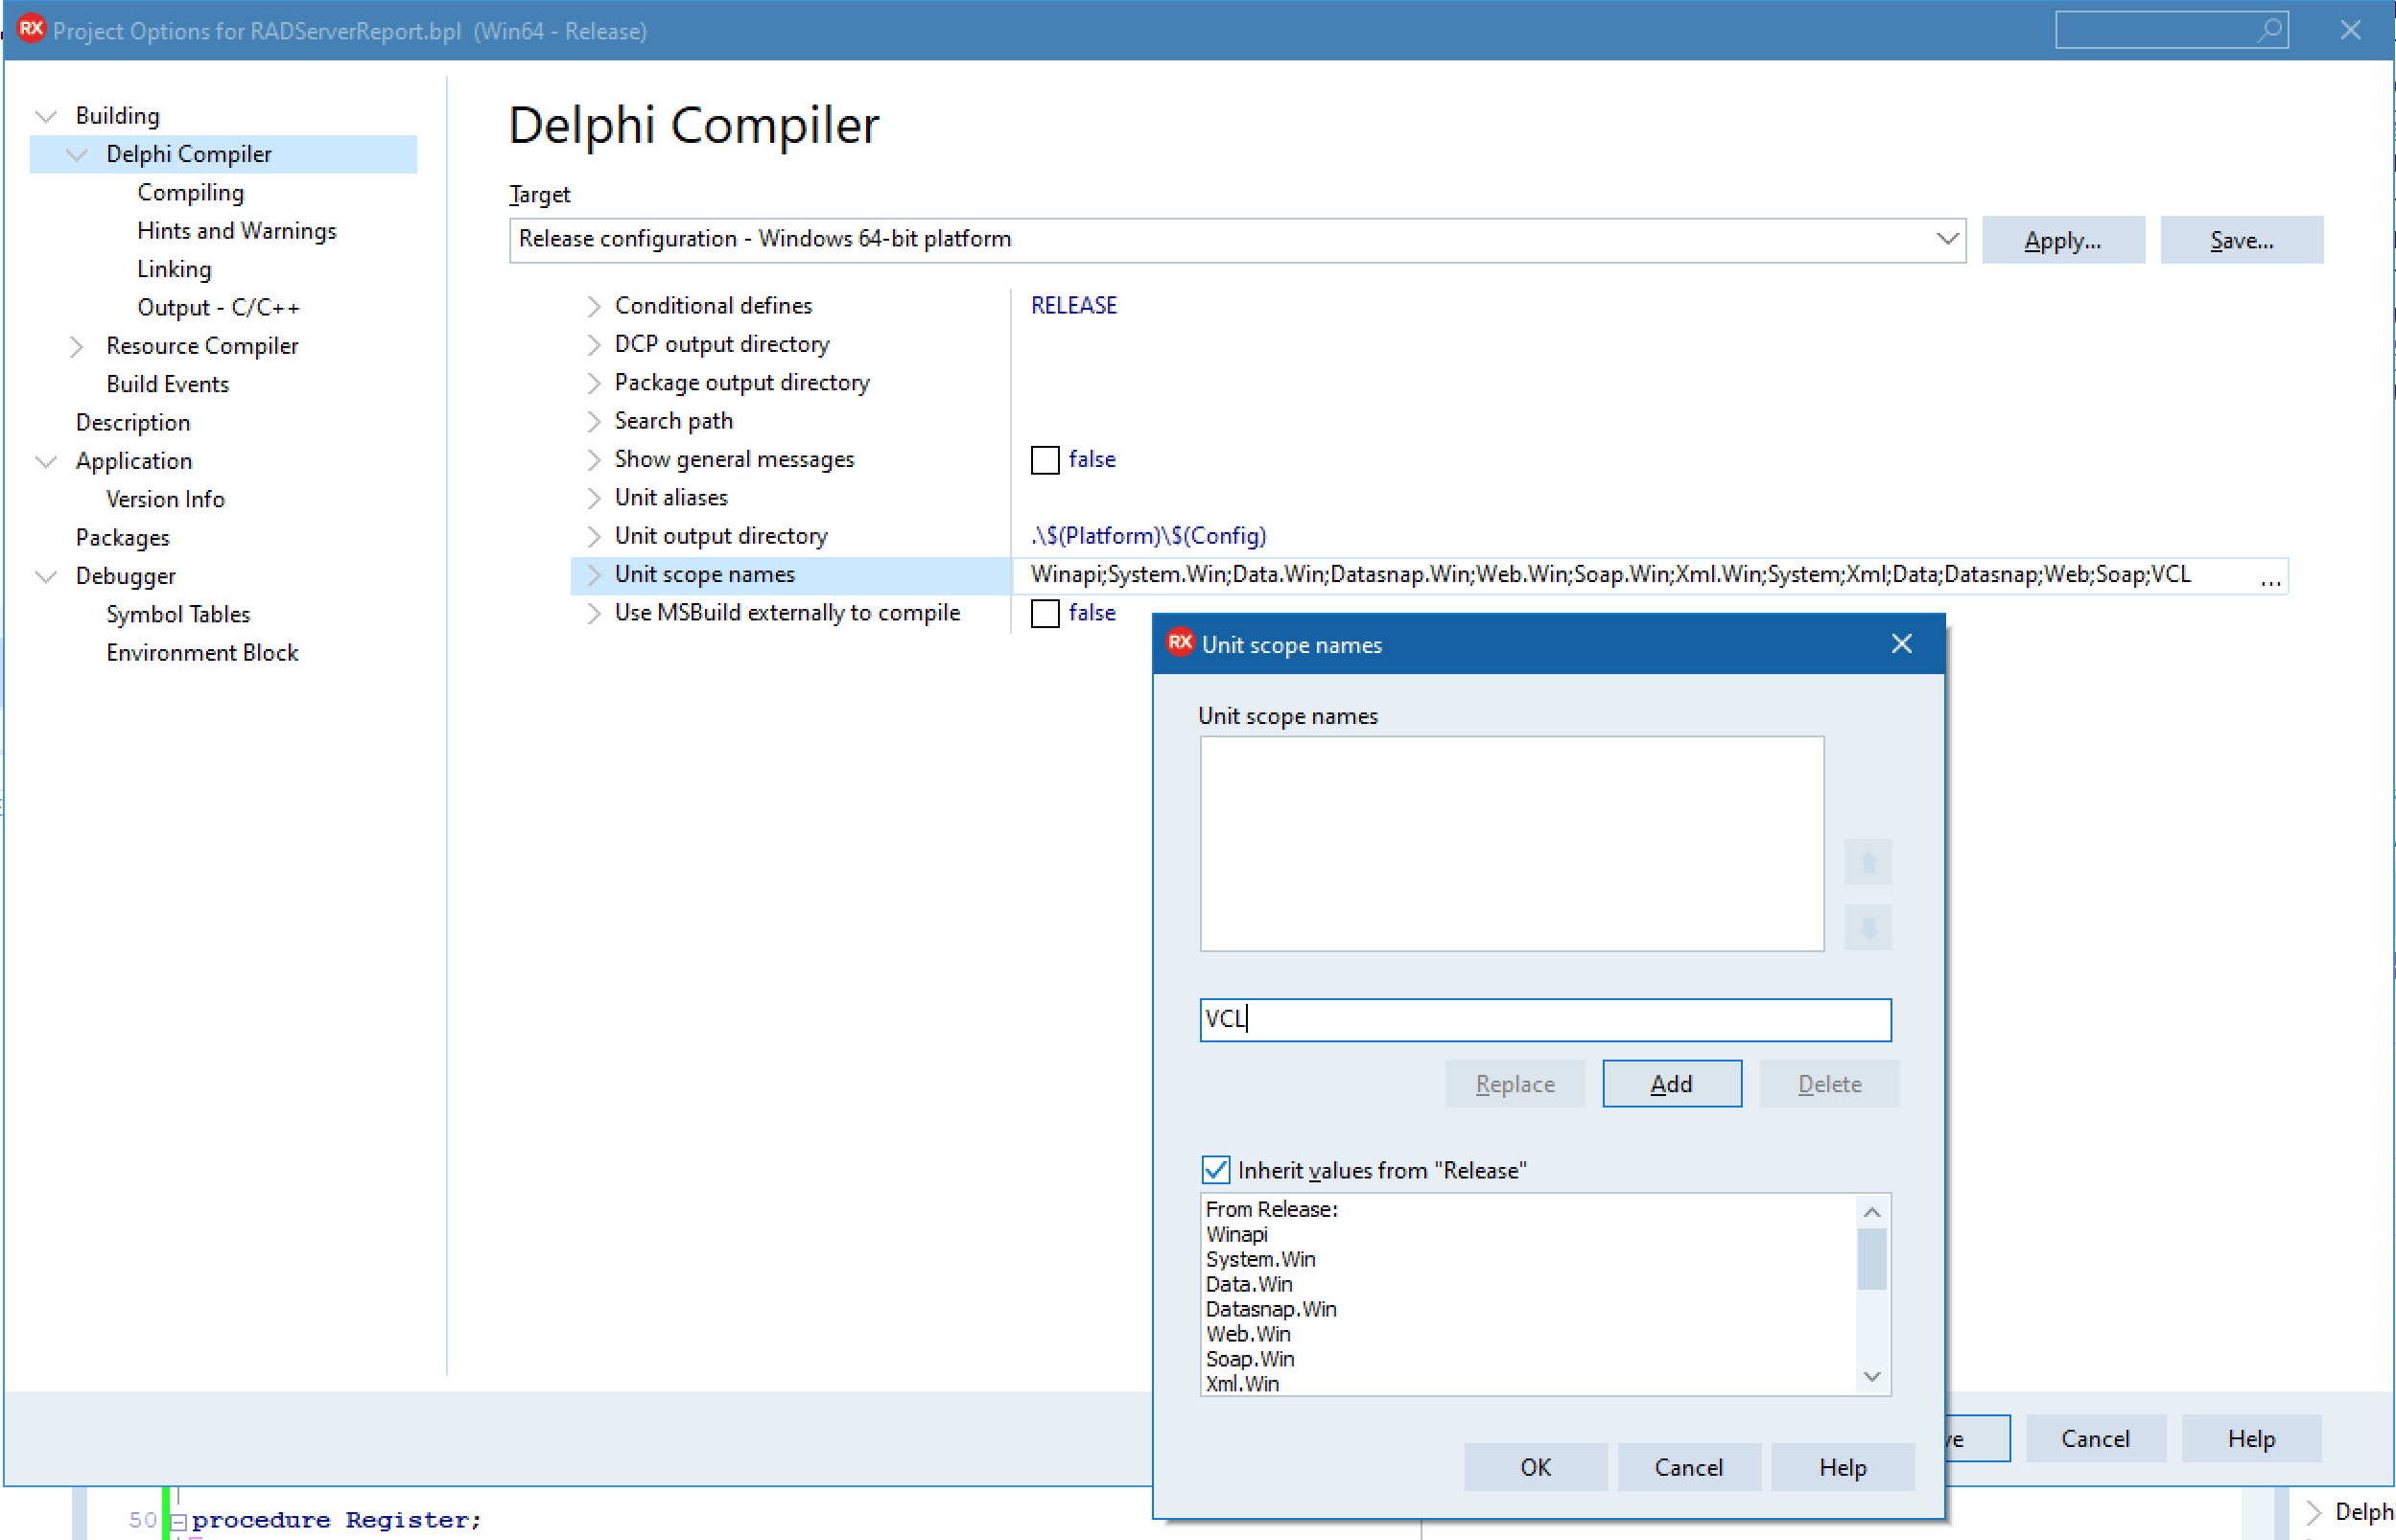
Close the dialog and you should now be able to compile.
Stage 3.3 – Creating the REST resource endpoint
Now is time to create the method and define the REST entry point.
Check you have both ResourceName attribute and ResourceSuffix set in the data module. I wanted to have a resource “reports”
[ResourceName('reports')]
TReportsResource1 = class(TDataModule)
with entry point for the exam passing in the exam_id.
[ResourceSuffix('./exam/{exam_id}')]
procedure GetItem(const AContext: TEndpointContext; const ARequest: TEndpointRequest; const AResponse: TEndpointResponse);
i.e. exposing resource /reports/exam/1/
Stage 3.4 – Finalizing the code to run with the RAD Server parameters
Although in the example of the exams, the ID is expected to be an Integer, any value can be passed in via the REST call. The first part of the code for the method, therefore, traps for a valid ID being passed in. It also raises the exception if something isn’t valid at this point.
procedure TReportsResource1.GetItem(const AContext: TEndpointContext; const ARequest: TEndpointRequest; const AResponse: TEndpointResponse);
var
  LItem: string;
  FN: string;
  fs, LReportStream: TFileStream;
begin
  LItem := ARequest.Params.Values['exam_id'</span>];
  // Ensure we have a valid ID and open exam qry
  ExamTable.Close;
  ExamTable.ParamByName('EXAM_ID').Value := LItem;
  try
    ExamTable.Open();
  except
    on e:Exception do begin
      AResponse.RaiseNotFound('Invalid Exam ID',e.Message);
    end</span>;
  end</span>;

  FN := TPath.GetTempFileName;
  LReportStream := TFileStream.Create(FN, fmCreate or fmShareDenyNone);
  try
    frxPDFExport1.Stream := LReportStream;
    // Generate the report
    frxReport1.PrepareReport(True);
    // Export the report
    frxReport1.Export(frxPDFExport1);
  finally
    // free the file stream object
    FreeAndNil(LReportStream);
    // NIL reference to the stream
    frxPDFExport1.Stream := NIL</span>;
  end</span>;

  fs := TFileStream.Create(FN, fmOpenRead);
  try
    AResponse.Body.SetStream(fs, 'application/pdf', True);
  finally
  end</span>;
end</span>;
The only other change in there is the introduction of the FN variable. (for FileName) This uses TPath to get a Windows Temp file where the report can be generated. Once the file is created, the handle is removed and then the file is read back into a stream for export. Note the fs stream needs to be left to RAD Server to free.
Finally, the AResponse.Body.SetStream method is used to send the PDF back to the calling application.
This should now work on the RAD Server development Server. Hit F9 to try!
Stage 4 – Deployment to Windows IIS Server
While this is now sorted on the dev machine, because it uses run time packages in deployment, we need to ensure the extra packages required are also distributed to our RAD Server instance.
When it comes to deployment, you might also find inspiration in the RAD Server Docker Technical Guide.
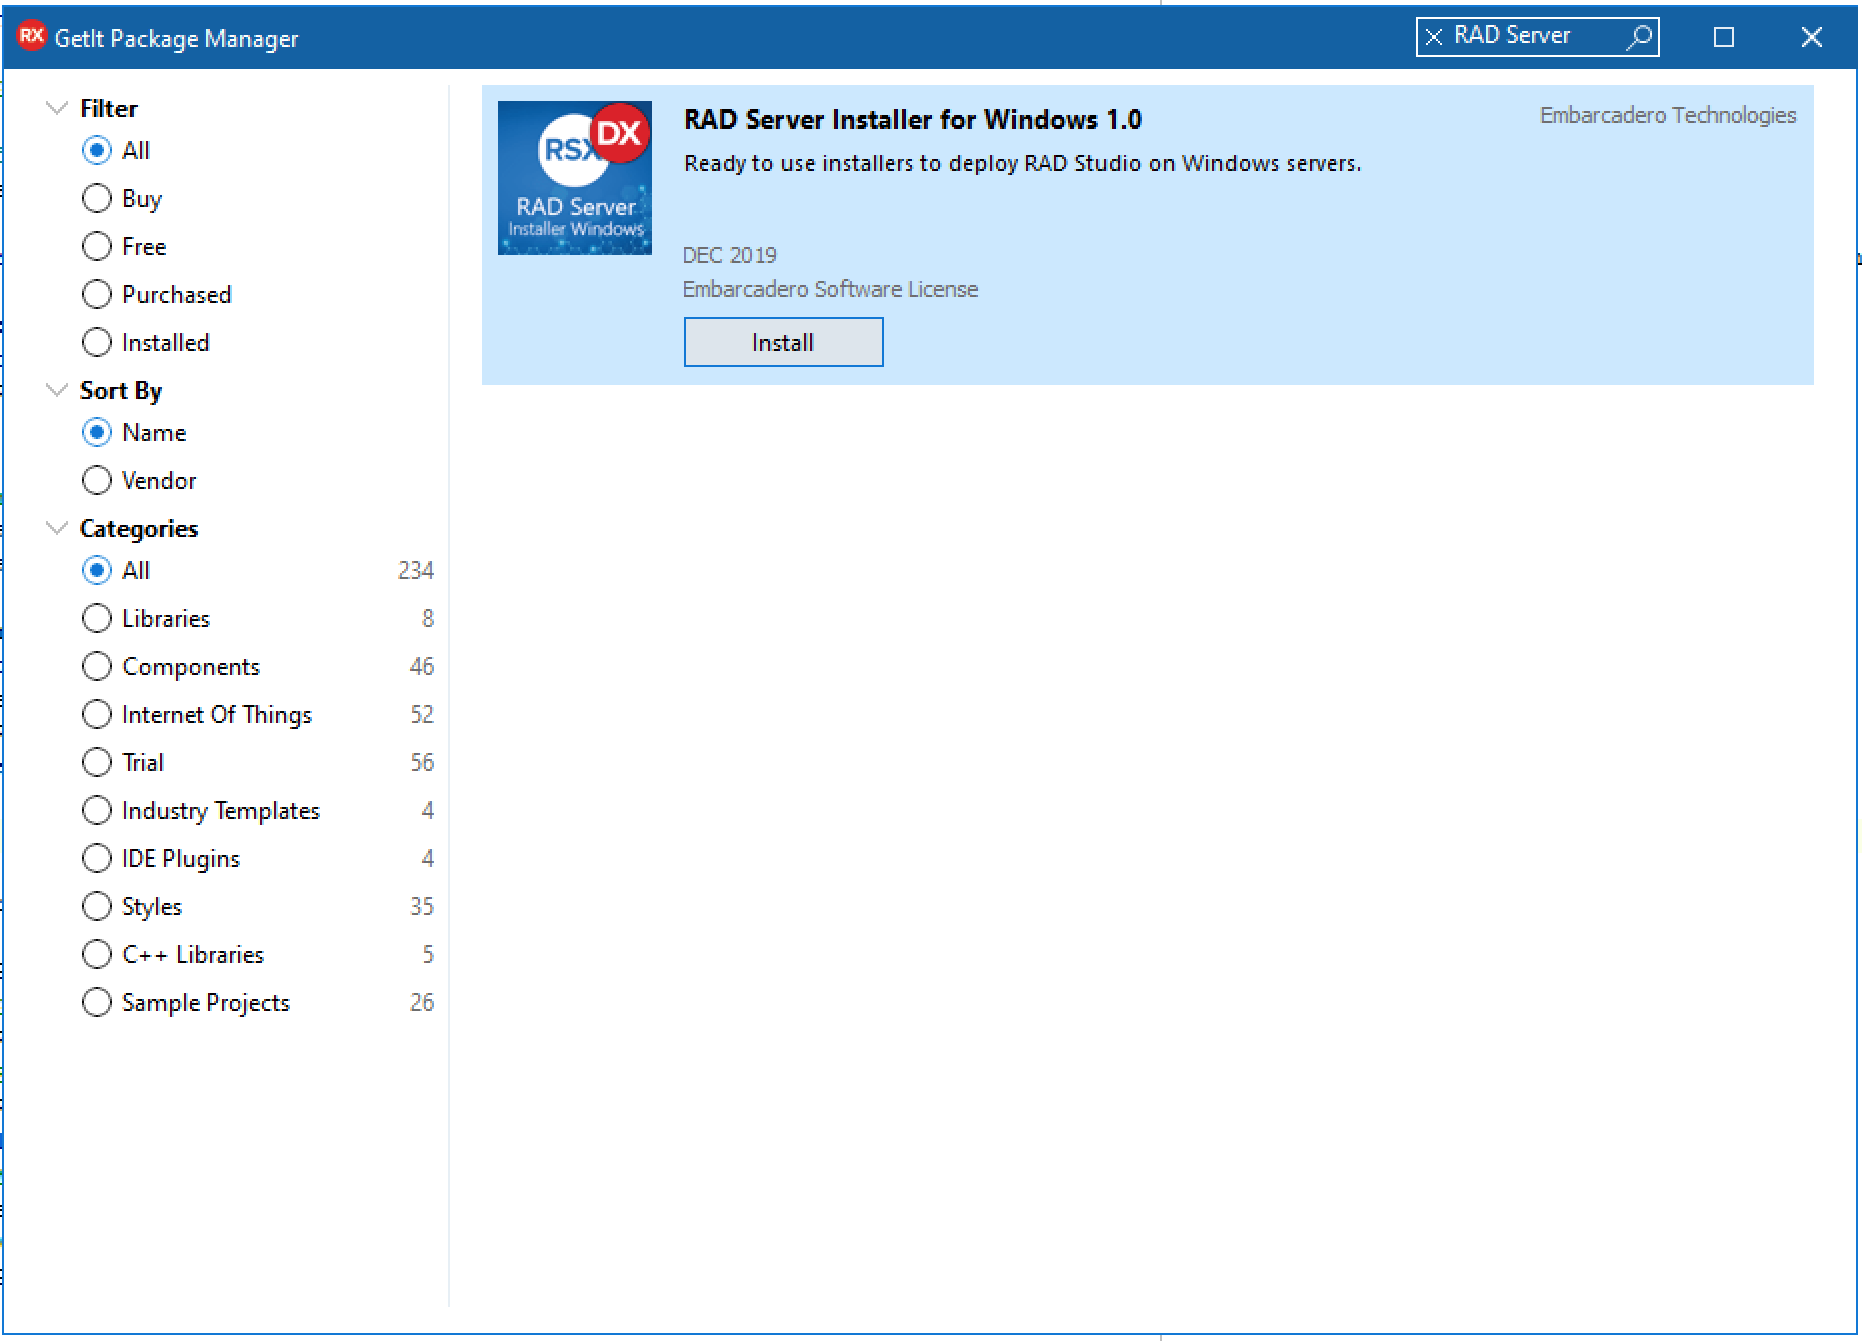
There is now an Installer for IIS!
I’m not planning to cover in detail setting up RAD Server in the cloud in this blog. But in short, you can now download an installer to use on Windows or Linux servers via GetIt. (Tools > GetIt Package Manager) – The button Install is a little miss leading as it just downloads it to your local catalog repository. e.g. C:\Users\embt\Documents\Embarcadero\Studio\20.0\CatalogRepository\RADServerInstallerforWindows-1033-1.0
Make sure you have the correct windows features installed on IIS for RAD Server before you run the Installer. Including, Web management Tools, Application Development Features (with ISAPI Extensions and ISAPI Filters) You might also find How-To: Deploy Your RAD Server Project On Windows With IIS by Jim McKeeth useful, however, I think this was written before the installer was released.
Deploying to Windows Server
I mentioned before, RAD Server is a BPL, and as such uses run time packages. While the base install setup includes all the BPL’s required for most RAD Server packages, because we have used Windows-specific components, we need to ensure that the extra packages we required are now deployed alongside our module package which we have created.
This use to be a tricky operation, but now we can do this very easily using PAServer to deploy to the remote machine. This will put all the files required in a folder ready for copying into production.
If you are unsure how to use PAServer on Windows, then please see the linked blog post. The key points.
- Install PAServer on the Windows Server (or your local machine if you need to deploy locally)
- Open with Windows Firewall and add PAServer.exe to the apps allowed access through the firewall.
- Right-click on the 64bit windows Target Platform, and under properties, create a profile pointing to your Server
- Under Project > Deployment choose the Deploy button to send the files to the remote server. (it will ask to compile if it needs to)
Under the PAServer install on the report machine, you will now find a directory with the files sent from RAD Server. You can compare and copy in the BPL files to the RAD Server install folder. For my report, this included
- frx26.bpl
- frxDB26.bpl
- frxe26.bpl
- fs26.bpl
- fsDB26.bpl
- vclimg260.bpl
Once the files are in place, make sure that the RAD Server module (not the other BPL’s) is added to the [Server.Packages] section of the emsserver.ini file: e.g.
[Server.Packages]
;# This section is for extension packages.
;# Extension packages are used to register custom resource endpoints
C:\inetpub\RADServer\radserver\reports.bpl=My Reports Resource Module
If you have any worries, you can test the configuration using the EMSDevServer.exe, once that is working, it should run under IIS.
The post Creating PDF Reports in RAD Server appeared first on Stephen Ball’s Technical Blog.