The ER/Studio Repository on AzureSQL
Pre-requisites:
Step 1: Create an Azure Account
First and foremost, you need an Azure account. If you don’t have one, go to the Azure website and sign up for a free account. Microsoft offers a 12-month free tier with access to certain products and services, including Azure SQL Database, making it an excellent way to get started without any upfront costs.
Step 2: Create a Resource Group
A Resource Group in Azure is a container that holds related resources for an Azure solution. You can create a new resource group directly from the Azure portal:
- Log in to the Azure Portal.
- Navigate to “Resource groups” from the navigation pane on the left.
- Click on “+ Create” and follow the prompts to create a new resource group. Choose a region that’s close to your users to minimize latency.
Step 3: Create an Azure SQL Database
Once you have a resource group, you can proceed to create your Azure SQL Database:
- In the Azure portal, click on “Create a resource”.
- Search for and select “SQL Database” and click “Create”.
- Fill out the form with the required information:
- Subscription: Select your Azure subscription.
- Resource Group: Choose the resource group you created earlier.
- Database Name: Enter a name for your database.
- Server: Create a new server by providing a unique server name, server admin login, password, and location. Remember these credentials, as you’ll need them to access the database.
- Want to use SQL elastic pool? Choose “No” unless you’re planning to share resources across multiple databases.
- Compute + storage: Click on “Configure database” to select the pricing tier. Azure offers a range of tiers to suit different needs and budgets. For testing, you can start with the Basic or Standard tier.
- Review and create: Once you’ve configured the options, click “Review + create” and then “Create” to provision your database. This process may take a few minutes.
Step 4: Configure Firewall Rules
By default, Azure SQL Database is protected by a firewall. To access your database, you’ll need to configure firewall rules:
- Navigate to your database in the Azure portal.
- Select “Set server firewall” under the “Security” section.
- Add a new rule to allow access from your IP address. Azure can automatically detect your IP and suggest it for the rule.
Step 5: Connect to Your Database
Now that your database is set up and secured, you can connect to it using various tools:
- Azure Data Studio or SQL Server Management Studio (SSMS): These tools provide a rich interface for database management and development.
- Connection strings: Azure provides connection strings for different programming languages (e.g., .NET, Java, PHP). You can find these under the “Connection strings” section of your database resource in the Azure portal.
To connect using SSMS, for example, you’ll need the server name, database name, and the credentials you set up during the server creation. Once connected, you can start creating tables, inserting data, and querying your database.
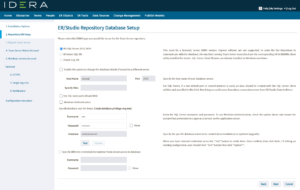
Step 6: Install Team Server Core
In page of the Configurator –> Choose AzureSQL
Please feel free to follow the steps as outlined from our documentation:
Install or Upgrade Team Server and Repository – TeamServer ER/Studio (embarcadero.com)
Conclusion
Setting up an Azure SQL Database is straightforward, thanks to Azure’s intuitive portal and the platform’s powerful PaaS capabilities. By following these steps, you can have a fully managed, scalable, and secure relational database up and running in no time. This setup not only reduces the complexity and overhead associated with managing database infrastructure but also allows you to focus on developing your applications and delivering value to your users.