Welcome! Last time we looked at the IDE, projects, a simple first application, and basic use of the debugger. Today we’re actually going to write code!
We are going to write a scientific calculator. It’s a useful, real-world app. You might put it on your phone and use it (and we’ll show how to do this in the last blog post of the series.)
Part of programming is good design. Programming is an art, and when you’re writing code, and you envisage your whole app, you feel very creative. It’s important to create well, though – to value quality. This isn’t just out of a philosophical drive to do something well if you’re going to do it at all; instead, it’s practical. Good code is code you can come back to later and keep working on after you’ve forgotten how it worked. To write code like that, it needs to be well designed, so you or anyone else can read it and figure out how it works. This makes debugging much easier, too. Debugging is hard enough already – if your app is clear, though, you can figure out problems with it much more easily than if it’s messy.
But also important is not just to design it well, but as you make changes, to keep it designed well.
Let’s illustrate this. First we’ll create the UI, and then we’ll start coding it wrong.
Building the UI
A scientific calculator has a fairly simple UI. It has buttons for numbers 0-9, a decimal point, math operations like addition and subtraction, and equals. Finally, it has a display area which displays what you’re entering, or the result of the operation.
Let’s build this.
Opening the app you had last time, delete the button on the form, so it is a completely blank form. Make sure you’re in the Master view in the toolbar at the top of the form designer – we can specialize for another platform, like iOS, later. Now in the Tool Palette, find TButton (you can type in the Search field, or open the Standard section, TButton is about the eighth entry) and add enough for all the buttons you need to the form. You can drag-and-drop, or double-click to just add in the center and drag them around later.
Important considerations for design:
Give your buttons good names. What is “Button14”? Who knows. But “btnEquals” is very clear: it's a button, and it's the one for 'equals'. (Try remembering which button is which when you have fourteen controls! Complex apps can have many more controls. Good naming is part of good programming.) You can change this in the Object Inspector, Properties tab, Name.
While you’re at it, change your buttons’ Text property to reflect their function – eg, change them to ‘0’ or ‘=’.
Hint
Note you can multi-select items by dragging a selection, or holding Shift while clicking. You can then edit the properties of multiple controls at once. I want my buttons to be square, so I’ve done that to change the Width and Height properties for all of them at once.
Next, add an edit box for the calculator to show its input and result. Use TEdit, and set its ReadOnly property to true – we don’t want users typing in it.
This is what mine looked like:
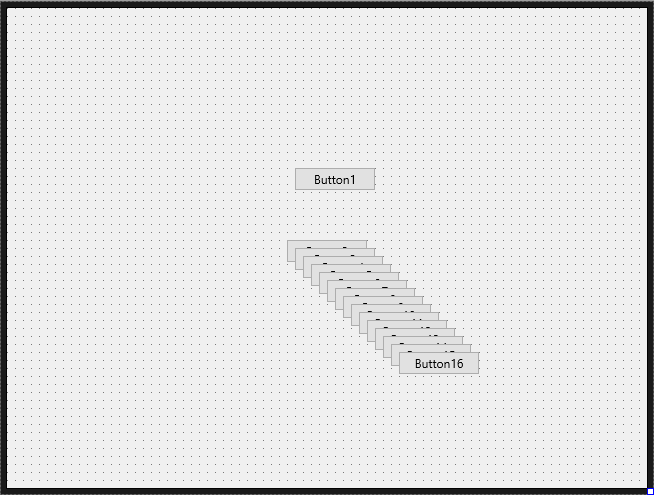
…partway through designing (after double-clicking on TButton a lot)
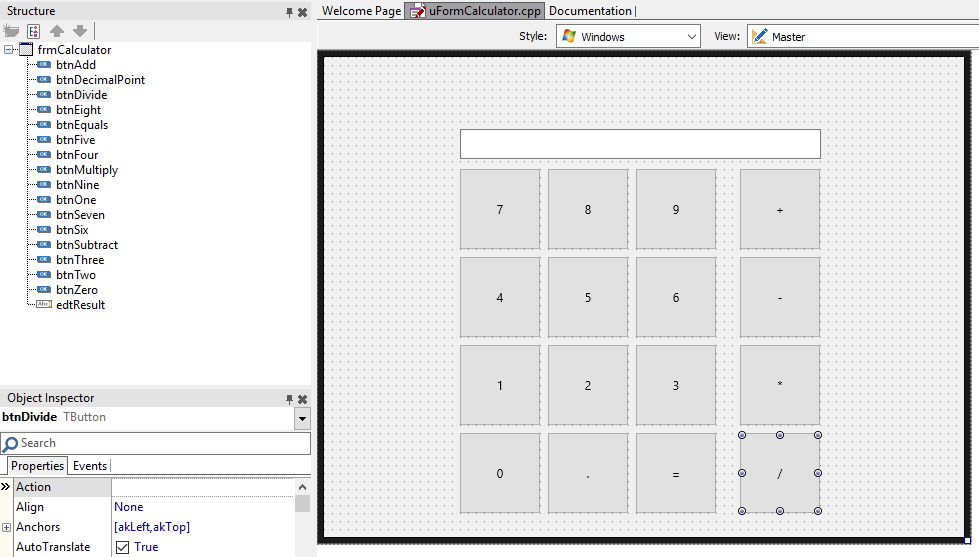
..and after moving the buttons, renaming, and setting caption Text.
UI design: done, for the moment. It's simple and we're going to improve it in a later post. Now, onto code! Bad code.
Homework question
We built a completely normal scientific calculator interface. We’ve all seen them before – we implemented the standard physical desktop calculator, with a grid of buttons and a small text area at the top.
But is implementing the norm the best approach? Yes, because we know how to use it already, but what if there’s a better way? If you were to reinvent the calculator, what would it look like? Pretend you’re Steve Jobs in 2001 – maybe the calculator could be more obvious and more intuitive? I have some ideas about this myself and would be interested to read more in the comments.
Starting coding – the wrong way
This is where it all goes wrong, and you can immediately tell the difference between a newbie and someone who has some coding experience. The aim of this article is to jump you right past being a newbie into best practices immediately.
We’re really enthusiastic. We want to get some numbers up on screen. So, let’s start making buttons do stuff. Double-click btnZero (this auto-creates its OnClick event; you can create other events in the Events tab of the Object Inspector) and write some code:
.
void __fastcall TForm1::btnZeroClick(TObject *Sender)
{
	edtResult->Text = L"0";
}
And repeat this for the other buttons. (What is the L prefix for the string? This was briefly covered in part 2; it indicates the string is a Unicode string – specifically, this is actually a string literal using wide characters, an array of wchar_t. There are lots of string types. This one is compatible with the Windows Unicode size and the VCL's String.)
Ok, now we can make the display have a number. But how do you enter a two-digit number? Hmm, maybe take what’s already there, assume it’s a number, and add in another digit:
.
void __fastcall TForm1::btnOneClick(TObject *Sender)
{
	edtResult->Text = IntToStr(StrToInt(edtResult->Text) * 10 + 1);
}
This is already convoluted – a bad sign. It takes the text, makes it an integer, multiples it by ten (so 2 becomes 20) then adds 1 (so 2 -> 20 -> 21), then converts it back to a string and sets the text.
If you try that, it will crash if 1 is the first button you press, because the edit has no text and so can’t be converted to an int. So let’s fix that:
.
void __fastcall TForm1::btnOneClick(TObject *Sender)
{
	if (edtResult->Text.IsEmpty()) {
		edtResult->Text = L"1";
	} else {
		edtResult->Text = IntToStr(StrToInt(edtResult->Text) * 10 + 1);
	}
}
…but this needs to work for all buttons, so copy/paste to event handlers for all the others.
But wait, this needs to keep some kind of track of the operation, so it knows if this is the first or second number in, say, a “+” operation. So maybe store the text as a std::wstring field in the form…
Hold on, all ten number events have to be updated…
No. No no no. This is getting out of control: code is convoluted, confused, hacked together, mixing data types (why is a string holding a number?), and is duplicated.
What happened?
It all started so obviously: press a number, that number displays. Then it grew. Then we had to add some logic, and that did odd things with strings and integers, for what is really a number (so why is it ever a string?) Then the code got copied ten times, even though it varies only a tiny little bit between all ten. Then we realised we needed to keep track of state, so we started adding various state fields in the form as variables. What happens when we need to implement Plus or Minus? How will we do that?
It got really messy, really fast, even though it started off perfectly logically.
The problem here is one of clean design. The form is the user interface – just that, the interface or graphics. Nothing else. We started trying to put calculator logic inside the form, mixing the UI and the calculations and state. That’s what led to a fundamental error like reading a number from a text field (the edit box) and to getting convoluted logic.
We started from the premise, “We have a UI; let’s make it do stuff”. That was the wrong premise, but it’s a really easy one to fall into when you have software that makes building a UI easy. The right premise is, “We have a UI, let’s connect it to something else that does stuff”.
There is a really important principle in app development, which is
Separate your user interface and logic
There are many ways to do this, most with acronyms (Presentation model, MVC, MVVM, YMMV (wait a second…), etc.)
Separating your user interface and logic means having several layers. Here we only need two: the user interface, and a calculator.
This all boils down to something else:
One class should have one purpose.
Here, the UI form (which is a class) should just be the UI: respond to button presses, display pretty stuff onscreen. That’s it. You want calculations? Have something that knows how to calculate – but doesn’t directly interact with the UI. That also means that the calculator doesn’t know about a TForm, per se – it just knows about some abstract presentation layer.
The nice thing here is that not only does this keep your code clean, but it means you can change any layer. Suppose you don’t want this to be a FireMonkey application, but you want it to be a command-line application (Linux support is coming in the next release!) If all your logic was in your UI, you’d be stuck with a huge rewriting job. As it is, if you have separate UI and logic layers with a clean interface between them, you can replace the form with a command-line interface that works exactly the same way. The moment your app is in a state where you can do something like that – even if you don’t need to right now – you know it’s well designed.
Starting coding – the right way
So, we need two layers: UI and calculator.
Clear out all the UI event code so we start clean. Then let’s think about how we want the two layers, UI and calculator, to talk to each other.
We actually don’t want the calculator to know it’s talking to a form – just a presentation or UI object of some kind. Similarly, the form can know it’s talking to “a” calculator but doesn’t need to know it’s this specific class or implementation. (We could replace the calculator layer as easily as we can replace the UI layer.)
The answer to this is to program to interfaces.
C++ doesn’t have interfaces as a language feature. Delphi does, and through our C++ compiler extensions you can use real genuine interfaces from C++, but we’ll stick to fairly pure C++ code in this series. C++ instead makes you use a class with pure virtual methods – that is, virtual methods that do not have an implementation. We’re defining a base class, but it is treated like an interface.
This is an excellent time to jump into some C++ syntax…
C++ class declarations
In C++, a class is declared with the “class” keyword, a name, and optional inheritance. Members go inside the braces. Methods have the type first, name second, as do variable. Here’s an example:
.
class Foo : public Bar {
private:
	int m_Number;
public:
	virtual void DoSomething(int a, float b);
};
This declares a class called Foo, which inherits from Bar. (You’re probably familiar with visibility specifiers in a class declaration in other languages; C++ allows those for inheritance too. It’s an advanced feature, use public by default.)
Then it has a private int member variable, and a public method which returns nothing (void, it’s a procedure not a function) and has two parameters, the first an int and the second a float. It is a virtual method, meaning it can be polymorphically overridden in a descendant class. Note the colons after “private” and “public”, and the semicolon after the class declaration (if you miss that, it actually expects a variable. Just keep the semicolon.)
Defining interfaces
Back to our interfaces. We want two: one that represents the UI or display layer, and one that represents the calculator itself. We’ll expand these as we add more features.
Create a new unit by right-clicking the project and selecting Add New > Unit – C++ Builder. Rename it “uInterfaces” and save. The following we’re going to put in the header half of the unit. We could also just add a header file through File > New > Other.
The display
A calculator only displays one thing: a few characters of text. (Let’s keep it text, not a number, to let the calculator control how the number is shown. A UI prints text, it does not print a number.)
Add this to the top of the .h, inside the #ifndef, #define section, so the whole file looks like this:
.
#ifndef uInterfacesH
#define uInterfacesH

#include <string>

class ICalculatorDisplay {
public:
	virtual void UpdateUI(const std::wstring& strText) = 0;
};

#endif
See that “=0” at the end of the virtual method declaration? That says it has no implementation, or is “pure”. This is how it’s an interface; ICalculatorDisplay declares methods but leaves it to a descendant to implement them; through the magic of polymorphism you can refer to an ICalculatorDisplay and the behaviour is actually that of whichever derived class, or class implementing the interface, you actually have. (C++ has multiple inheritance, so implementing an interface is just inheriting from that pure virtual class and implementing the methods, as well as possibly inheriting from concrete classes as normal.) Read more about declaring an interface here including some quirks to do with destructors not in the simple example above.
Some more C++ syntax. “std::wstring” is the variable type. Here, “std” (pronounced exactly as it’s written, no vowels like “stad” or “stod” – it’s “std” or “st’d”) is the standard namespace. C++ defines a lot of useful things in this namespace usually referred to as the STL, or standard template library, except it contains a lot more than templates. The :: accesses something inside the namespace; :: is used for all scope identification like classes, too, so MyClass::MyMethod refers to the method itself. std::wstring is a wide string, which uses a character size compatible with Windows Unicode and FMX’s String type.
The #include statement includes the string header, which is part of the STL and is where std::wstring is defined. C++ has a very basic mechanism for units and for referring to other files. A logical unit is split up into code and a header, as mentioned in part 2. Instead of “using” or “referencing” another unit, it includes the header, and that means literally includes – to the compiler, the entire contents of the “string” header will be inserted at that location. All it does it let it know the classes and methods defined in the header should exist; it won’t actually check they exist, though, until it tries to use them, which means a header can contain lots of methods (say) that don’t exist but you won’t get an error until you link. This is also where the #ifndef part comes in – it means if a header is included twice, it will only actually be included the first time, because the second time around the macro is defined and so the preprocessor will skip the contents of the ifdef block. You’re quite right, this is crazily basic for a language in 2016. A long-awaited feature, modules, may make it better in C++19.
Includes should be at the top of the file, whether it’s a .h or .cpp file. (You can include something anywhere, but this is good practice.)
The ampersand means it is a reference. A reference means you are accessing the object itself – the parameter here is not a string object but points to a string object somewhere else. Unlike a pointer, references are guaranteed to exist – they cannot be null – and you use them with syntax exactly like a normal non-pointer stack-allocated object, not like a pointer.
Const means the reference cannot be modified
After the ICalculatorDisplay declaration, still inside the #ifdef, add the following: The methods in ICalculator are self-explanatory. AddDigit is for when 0-9 is pressed; AddDecimalSeparator is for when you press “.” to start entering fractional numbers, and SetOperator is to define whether it should be using plus, minus, and so forth. We will expand this interface in the future – this is a rough draft. You can see the skeleton of a better design appearing. The calculator has no knowledge of buttons or edit boxes and it’s going to look after all its own state. The form has no knowledge of the calculator’s internals, because it will refer just to this interface – the class implementing the interface could do anything and it won’t know or care. We have some new syntax here, defining an enumeration. Old C++ used the “enum” keyword; in C++11 you can use enum classPart 2, which you can refer to if you need. Finally, let’s actually implement these interfaces. In the form header, change the form’s class declaration to look like this, multiply inheriting from both TForm and from the interface: Then we want to implement the interface. In the public: section of the form, copy the interface method, but remove the =0 because we want it to exist in the form: And implement it in the form. You’ve already seen implemented methods in the form of event handlers (which are just methods), so go ahead and implement an empty method in the form’s .cpp file like so: You don’t need (and in fact can’t have) the virtual keyword on the implementation, only the declaration. Add a new unit, and rename it to uCalculator. In the header, include the interface header file, define a class inheriting from ICalculator, and containing its methods as virtual but not pure any more – exactly as in the form. It should look like this: I’ve added a constructor and destructor, too. These have the same name as the class, except the destructor is prefixed with ~. Note that this means a C++ class can have multiple constructors with different parameters, but because the constructor is indicated by it having the same name as the class, it cannot have multiple named constructors (CreateEmpty, CreateWithFoo, etc.) I also separated and commented the methods that come from the interface vs those introduced in the class itself. This is personal preference. On to the .cpp file, and copy the methods and implement. Note the method is declared with ClassName::MethodName syntax, following :: described earlier. For the time being, leave the methods empty. Our calculator now has a UI and a calculator class. They're not aware of each other yet, but will be in the next lesson, where we'll hook the two together and implement the calculator class to start doing math. (Why not in this lesson? Because it moves on to many other things, such as smart pointers. Cool stuff – next time!) This post, we covered: Next in the Learn to program C++ with C++Builder series: The calculator
.
enum class eOperator {
	eEquals,
	eAdd,
	eSubtract,
	eMultiply,
	eDivide
};

class ICalculator {
public:
	virtual void AddDigit(const int Digit) = 0;
	virtual void AddDecimalSeparator() = 0;
	virtual void SetOperator(const eOperator Op) = 0;
};
Implementing the interfaces
In the form
.
class TForm1 : public TForm, ICalculatorDisplay
.
public:		// User declarations
	__fastcall TForm1(TComponent* Owner);
	virtual void UpdateUI(const std::wstring& strText);
.
void TForm1::UpdateUI(const std::wstring& strText) {
	//
}
Creating the calculator
.
#include "uInterfaces.h"

class TCalculator : public ICalculator {
public:
	TCalculator();
	virtual ~TCalculator();
public: // ICalculator
	virtual void AddDigit(const int Digit);
	virtual void AddDecimalSeparator();
	virtual void SetOperator(const eOperator Op);
};
.
#include "uCalculator.h"


TCalculator::TCalculator() {

}

TCalculator::~TCalculator() {

}

void TCalculator::AddDigit(const int Digit) {

}

void TCalculator::AddDecimalSeparator() {

}

void TCalculator::SetOperator(const eOperator Op) {

}
What did we cover today?
Read more